How to draw a girl’s face – step by step instructions. For many people who love to draw, the goal is to beautifully draw a girl’s face.
However, drawing a girl’s face can be one of the most challenging subjects due to its complex and intricate physical characteristics.
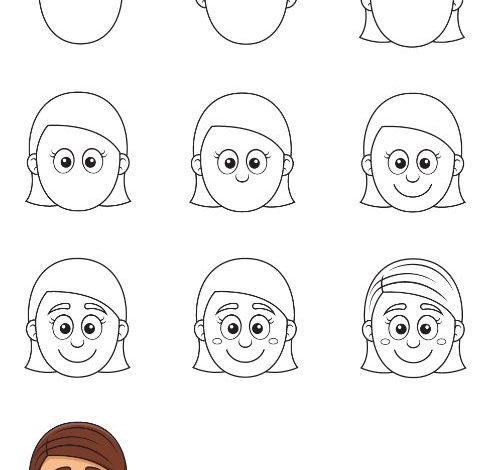
Luckily, we’ve put together a step-by-step tutorial on how to draw a girl’s face, summed up in 9 simple and easy steps.
You can involve these stages to outline a realistic or cartoon face. Each step is accompanied by easy-to-understand illustrations that act as a visual guide as you follow the instructions and also check our girl drawing.
How to draw a girl’s face – let’s get started!
Step 1
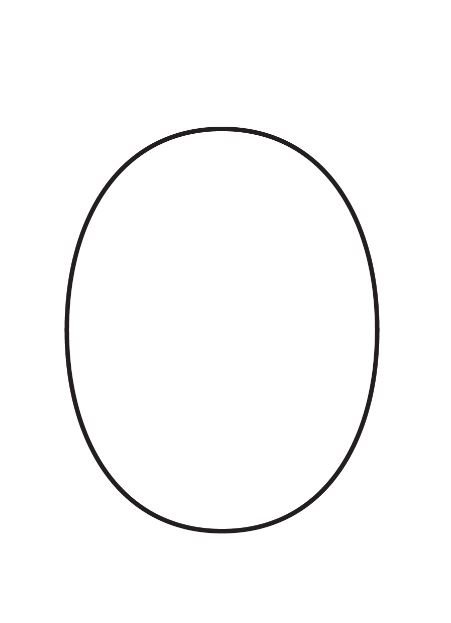
Starting right in the middle of the paper, draw an oval shape to create an outline of the face. You can draw the face shape as you like.
If you prefer a slimmer face, draw an elongated oval shape relatively similar to an inverted egg shape to complete the fantasy of a more extended face.
Otherwise, if you choose the look to appear rounder, emphasize the roundness of the cheeks.
Step 2: Draw the ears
Pull out a pair of ears on either side of the face. You can tighten the ears, yet you like: round, pointed, square, or any shape you like.
Here’s a helpful tip: To draw ears evenly, you can draw guides that enclose the entire face. It will serve as a guide on where to draw the ears.
Step 3: Add the hair to the face
Now it’s time to add the hair to your design. You can make your hair as long or short, as thick or as thin as you like. Besides, you can even decorate it with accessories like a headband, hairpin, and more.
Girls generally have narrower and shorter foreheads when drawing hair on female characters than boys. Therefore, the hairline should not be too far from the eyebrows. Also, don’t forget to count the book to your hair by departing sufficiently distance between your head and hair.
Step 4: Then draw the eyes
Draw two uniform round shapes for the eyes. You can draw reference lines on the face and use them as guidelines to ensure the eyes are drawn on the same plane.
Inside the round shape, draw two more circles inside the outline. During this time, fill it in with the shade to quickly identify as the eye pupil. When shading the pupils, leaving a small circle without shading dramatically affects the eyes and shimmer.
You can dress the looks however you like. There are six different eye shapes: almond-shaped, inverted, hooded, fixed, downturned, and round.
When drawing eyes, always remember that women generally have broader and more open eyes than men. Finally, don’t forget to put some eyelashes on the eyes.
Step 5: Then draw the nose
Draw an inverted curved line under the eyes, right in the middle. It serves as the tip of the nose.
Where you pull the nose determines how long or short, it will be. If you like the beak to examine short, pull it close to the eyes. Otherwise, pull it down a bit if you want it to look longer.
Step 6: Put a bright smile on your face
Add some expression or emotion to your drawing by adding a big smile. Under the nose, draw an inverted curved line similar to the previous step. This time, however, it should be relatively larger.
Don’t hesitate to shape her mouth the way you want! You can also open your mouth almost like your drawing is laughing. To do this, draw a horizontal line with a curved line at the bottom. If drawn correctly, it should appear as a slash “D”.
Step 7: Then add an eyebrow
Draw a curved eyebrow just above each eye. In general, girls have thinner and more curved eyebrows than boys. So be sure to maintain that in the sense when styling your eyebrows.
Don’t be afraid to play with the shape and thickness of the eyebrows as much as you like. Just remember that the shape of your eyebrows has a massive impact on your character’s facial expression.
Step 8: Apply blush to the cheeks
You wouldn’t finish a lassie’s face without a touch of blush. A blush will make your drawing more feminine and add emotion to your character’s face.
To add a slight blush effect, draw two oval shapes to the side on either cheek. Keep it a little further from the nose for a more natural look.
And there you have it: a beautiful blushing girl! With that color on her cheeks, she glances like she’s either happy or embarrassed. Maybe? Either way, it looks beautiful, and we’re sure your drawing will look even better!
Step 9: Add details and patterns to the hair

Here you can see the almost finished drawing of a girl’s face! The only thing missing is a touch of color to complement your artwork!
Finally, here comes the most exciting part: fill in the colors for your fantastic drawing! It is the part where you can show off your artistic skills and your ability to mix and match different colors.
Start coloring your look. Mix red, yellow, brown, and white shades to complete a complexion. Depending on the complexion you’re going for, you may want to add more of a particular color than the rest.
After coloring the skin, you can proceed to the hair and eyebrows, which should be the same color. What inch of paint do you think will look best in your design? Maybe a brunette or ordinary black hair? You can use even more vibrant colors like pink, purple, and more! It’s all up to you!
Have fun playing with colors and see your girl’s face drawing come to life!
Your girl face design is ready!
We expect you appreciate this step-by-step manual on how to attract a lassie’s face. With this manual, you can draw and color a girl’s face in no time, along with her intricate facial features and intricate details.
Also read: How to Stay Regular To Occupy Your Dog